Clay pottery is an ancient art form that has been practiced for thousands of years. From functional kitchenware to decorative pieces, pottery serves both practical and aesthetic purposes.
In recent years, there has been a resurgence of interest in handmade crafts, including clay pottery, as people seek creative outlets and unique ways to express themselves. This guide will walk you through the basics of making clay pottery at home, whether you’re a hobbyist looking for a new pastime or an entrepreneur aiming to sell handmade products online.

Types of Ceramic Pottery
Before diving into the process, it’s important to understand the various types of ceramic pottery you can create at home:
- Earthenware: This is the most common type of pottery. It’s fired at lower temperatures and has a porous, rustic appearance. Earthenware is ideal for decorative pieces and functional items like plant pots and plates.
- Stoneware: Fired at higher temperatures than earthenware, stoneware is more durable and waterproof. It’s perfect for making mugs, bowls, and other kitchenware.
- Porcelain: Known for its delicate and refined qualities, porcelain is fired at the highest temperatures. It’s ideal for fine art pieces, intricate sculptures, and high-quality dinnerware.

Steps to Make Clay Pottery at Home
1. Gathering Materials
To start making pottery at home, you’ll need the following materials:
- Clay: Choose the type of clay based on the pottery you want to create (earthenware, stoneware, or porcelain).
- Potter’s Wheel (optional): While not necessary, a potter’s wheel can help create symmetrical pieces.
- Basic Tools: These include wooden and metal ribs, cutting wire, loop tools, and sponges.
- Glazes and Underglazes: Used to decorate and waterproof your pottery.
- Kiln: Essential for firing the clay and setting your pieces.
2. Preparing the Clay
- Wedging: This process involves kneading the clay to remove air bubbles and ensure a consistent texture. Properly wedged clay is crucial for preventing cracks and defects in your pottery.

3. Shaping the Clay
- Hand Building: Techniques like pinch pots, coil building, and slab construction allow you to shape clay without a potter’s wheel.
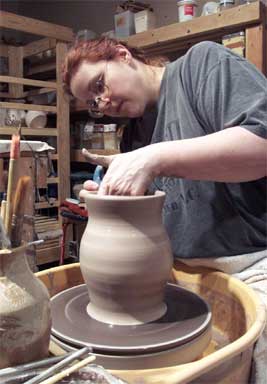
- Wheel Throwing: If you have a potter’s wheel, this method helps create symmetrical and refined pieces. Center the clay on the wheel, then use your hands and tools to shape it as it spins.

4. Drying
- Leather-Hard Stage: Let your pottery dry to a leather-hard consistency, where it’s firm yet still workable. This is the stage to refine shapes and add details.
- Bone-Dry Stage: Allow the pottery to dry completely before firing. It should be completely dry and fragile at this point.

5. Bisque Firing
- First Firing: Load your bone-dry pieces into a kiln and fire them at a low temperature (usually around 1,800°F or 982°C). This is known as bisque firing, and it transforms the clay into a porous and durable state.

6. Glazing
- Applying Glaze: After bisque firing, apply glazes to your pottery. Glazes can be dipped, brushed, or sprayed onto the surface. They add color, texture, and waterproofing.
7. Glaze Firing
- Final Firing: Place the glazed pieces back into the kiln for the final firing. This firing is done at a higher temperature, sealing the glaze and finishing the pottery.
Essential Equipment for Making Pottery at Home
To successfully make pottery at home, you’ll need some essential equipment. Here are a few recommendations with real-world products and reviews:
1. Kilns
- Paragon SC-2 Kiln: A popular choice for home potters, this compact kiln is perfect for small projects. It’s praised for its reliability and ease of use. You can find it on paragon site .
- Skutt KM-818 Kiln: Ideal for larger projects, this kiln offers precision control and consistent results. It’s available at Skutt website.
2. Potter’s Wheels
- Shimpo VL-Whisper Wheel: Known for its quiet operation and smooth performance, this wheel is a favorite among hobbyists. Available at Dick Blick.
- Speedball Artista Tabletop Wheel: A compact and affordable option, perfect for beginners. Find it on Amazon.

3. Tools and Accessories
- Xiem Studio Tools Ultimate Decorating Kit: A comprehensive set of tools for decorating and detailing your pottery. Available at Amazon.
- Amaco Underglaze Decorating Colors Set: A versatile set of underglazes for adding vibrant colors to your pottery. Find it at Dick Blick.
4. Glazes
- Mayco Stroke & Coat Glazes: Highly recommended for their vibrant colors and ease of use. Available at The Ceramic Shop.
Advantages of Making Clay Pottery at Home
Creating clay pottery at home offers numerous benefits:
- Creative Outlet: Pottery allows you to express your creativity and make unique, personalized items. The tactile nature of working with clay is both therapeutic and rewarding.
- Functional Art: You can create functional items like mugs, bowls, and plates that are both beautiful and practical.
- Potential for Income: If you enjoy pottery and develop your skills, you can turn your hobby into a business. Handmade pottery is highly valued and can be sold online through platforms like Etsy, at craft fairs, or in local shops.
- Community and Connection: Joining pottery classes or online forums connects you with a community of like-minded individuals who share your passion.

The Growing Popularity of Pottery
In recent times, there’s been a notable increase in interest in pottery. Many people are drawn to the hands-on, meditative nature of the craft. Social media platforms like Instagram and Pinterest showcase stunning pottery creations, inspiring others to try their hand at this art form. Additionally, the demand for unique, handmade items has surged, making pottery a viable entrepreneurial venture.
By following this guide, you can start your journey into the world of clay pottery. Whether for personal fulfillment or as a business opportunity, making pottery at home is a rewarding and enriching experience.
